Mechs
This sections explains all the mechs that happen in g2-2.
Angry birds
🗒️Explanation
This pattern happens every 2 minutes of the fight.
Kazeros sends everone flying and covers the whole map with black fog except for a few spots. After a moment you will be able to interact with a mouse to choose which direction to fly to. Then Kazeros will send 4 lines toward 4 diferent safepot and perform a guard after that.
If you fail it you wont be able to do anything and will slowly fly towards the Kazeros. If you are unlucky then you will also be on the path of slash - without DR you are dead. If you flew to the wrong spot you can also timestop just before slash reaches you.
✅Useful information
Its important to keep Kazeros middle during the fight to avoid this mech close to the wall - it will limit the available space and also might block you if Kazeros is standing right on top of you and next to the wall.
To control where you want to go you have to click and hold mouse towards the opposite direction (reverse movement) - the longer you hold the further you will fly. You can also pre-click and hold mouse the moment this mech happens. Just dont release it.
Its always better to fail this mech by flying anywhere and timestopping then not doing it at all.
To find a safe spot you have to look where the boss is facing and check where is the closest spot counterclockwise to that direction, ex.: If he is facing 12, safespot will be on 11; if he is facing 5, safe spot will be on 4 etc. Same goes for his back - it will be closest counterclockwise spot to where his back is pointed. Below are some examples:
Full meter
🗒️Explanation
After Kazeros's meter fills up he teleports middle and cover whole map with lines + puddle explosions. 4 random people gets marked and are chained to each other in pairs. After the timer runs out 2 of those 4 people get chained to each other. You have to stay chained to the other person for the duration of the timer. If a mech is solved corectly Kazeros will explode one side of the map which is determined by one of the chained people after they solve the mech with a target over them (they can point kazeros towards any direction). creating quicksand there which kills any players who step into it.
If you fail the mech Kazeros will instead explode 4 sides of the map making it extremely difficult to play.
✅Useful information
You have to prioritize not breaking chains over anything. Its advised that if you are tethered to somebody you should stand on the same side of the boss and use your push immunity/get hit by the puddle and just lay down.
Supports should always awaken first pair of chains and DR second. In a situation where you dont have awakening (close to or right after 300x mech) you should use all your shields on first and DR on second. DPS can also (and should) timestop it while standing on top of each other.
Because of Lost Ark's izometric view its best to destroy top side. After that you should actively avoid playing on the destroyed side and reposition Kazeros with any patterns.
Full meter has also funny gimick - it cancels instantly any mechs that are active.
So far i encountered only one cancel that can actually kill you:
600x/150x
🗒️Explanation
Kazeros have 2 specific mechs during this gate that can either take time of your gate or increase it. They happen at 600x and 150x and can never repeat, which means you will get both, but randomly decided which one first.
1. Elgic counter
Kazeros will teleport middle and begin a series of guard and counters. At the end he does a co-op counter. Failing it results in a raid wipe.
There are 2 variations in TFM (HM has only first one):
2x Counter -> 2x Guard -> Counter -> Guard -> Counter -> co-op counter.
Guard -> Counter -> Guard -> 3x Counter -> Guard ->co-op counter.
Its important to know that only the person who counters will have its cooldown refreshed and if you fail a guard you will get stunned for the remainder of the mech.
✅Useful information
Ideally you choose people with multiple counters + long ones to do earlier ones so that they have their counters ready for last one.
The way he travels after every guard and counter is scripted as well. It means he will always rotates/dash the same way every single time throughout many runs. If you can learn how he moves you can preemptively position yourself in front of him just before counter happens.
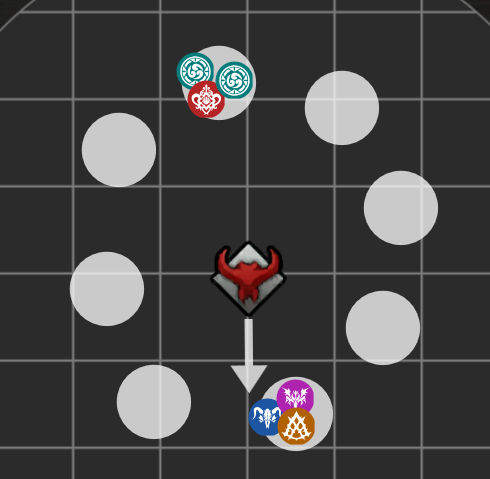
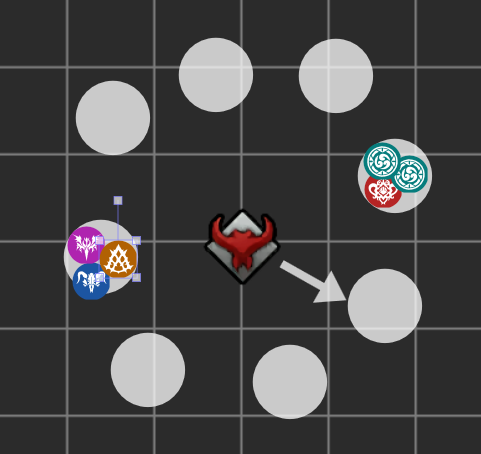
2. Elgic Up-Down
This pattern has 2 variations, but the main idea stays the same. Kazeros will do a co-op counter and make 3 people fly around with them either staying on the same level, going up or going down. They all move together and will end up on the same altitude. After they stop moving Kazeros will either glow dark or white. Then you either want to Counter him (which makes him swap his colour to the other one) or not. There are 2 solutions to this one - i will explain both of them and you can choose whichever one you prefer.
2.1 Elgic Down version
Solution 1: People end up on lower altitude -> you need white Kazeros (he only attacks higher altitude) -> check which color is Kazeros | If white - good, hide behind | If dark - bad, co-op counter him so he swaps colour and then hide behind. In example below you want to co-op counter him if he is dark, because people are close to the ground.
Solution 2: Instead of looking at players you look at the Kazeros. He will dash 3 times while also changing his color (his 'afterimage') between them while people fly around. In example below he was 'Dark -> Dark -> Dark'. His last colour change (so only the 3rd dash) will determine which one you co-op counter - you want to co-op counter the same colour as his last dash.
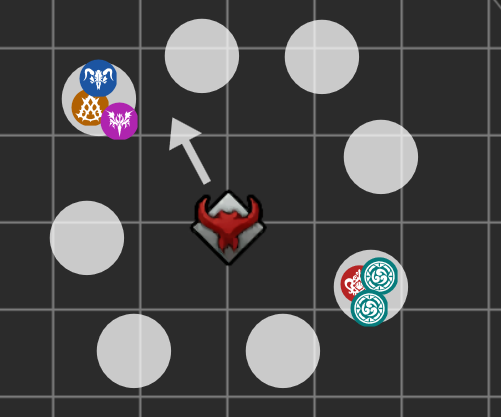
2.2 Elgic Up version
Same principle.
Solution 1: People are in the sky which means you want co-op counter him if he is white.
Solution 2: His last dash was white (start of the video) which means you want to co-op counter him if he is white.
✅Useful information
For some more examples check Memorizer's video. He explains this mech with Solution 2 (and i think most if not all players will find it easier after getting used to the colours).
People who will be sent flying are the same ones who co-op counter. That means you can control who do you send - you also have a lot of time to co-op counter (~2 seconds), but dont greed it - its better to do the mech than cause a raid wipe.
500x
🗒️Explanation
Just a simple DPS check. Deal enough damage during 1 minute for his additional bar to dissapear. You get additional timer if you manage to do it. If you fail it you lose time - which just means a restart.
✅Useful information
You want to use offensive armen (first one) on this and recast him. He will take care of >50% of the bar. First hit of armen is a close range attack followed-up by a beam that goes throught the whole arena - wait a bit to see his next pattern and try to use it instantly on a decent one without running out of time. His recast are projectiles which autoaim so you can use it right away as long as the pattern is not making him untargetable.
300x
🗒️Explanation
Hardest mech in this gate. Kazeros will surround himself with a shield and activate a stagger check. You have to destroy his shield first to be able to deal any stagger at all. During this mech he will spawn lots of diferent explosions that you have to avoid - each time you get hit they reduce your stagger and damage by 5% up to 50%. There is also gonna be a guard during all of this the moment orbs on the edge collide.
After getting rid of his shield and staggering him, he will activate one more stagger. After completing it he will shield himself again which you have to destroy. During this the same orbs will reactivate in the same direction to guard.
✅Useful information
Supports should use Hyper awakening at the start to prevent people from dying if they fail guard and also to help with the shield.
You shouldnt tank anything in this phase if you can avoid it.
Waves that spawn right after the shield gets destroyed are fixed - they always spawn from 'Bottom -> left -> top -> right'. Best way to avoid them is to just hug boss on the top right and move clockwise every time wave in front of you disappears.
You should also learn which skills of yours you can cancel to guard. All the explosions in this phase are para immune so just before guard happens you should use something to not get staggered and then guard towards the orbs.
You can also use 1-2 DPS hypers if you find your damage lacking.